April 22, 2022Beginner-12 min
How to implement Single Sign-On with ABP commercial application
Introduction
There are lots of reasons for using SSO for custom applications owned by the same enterprise organization. SSO establishes better user experience, less development time and improved security. SSO also enables to upgrade a large codebase a piece at a time instead of all at once, you will be able to effectively link them together as if they were one. In this article, we’ll simulate such a scenario by implementing SSO for an .Net core MVC application and an ABP Commercial modular application. Through this article you will also learn how the two platforms implement authentication.
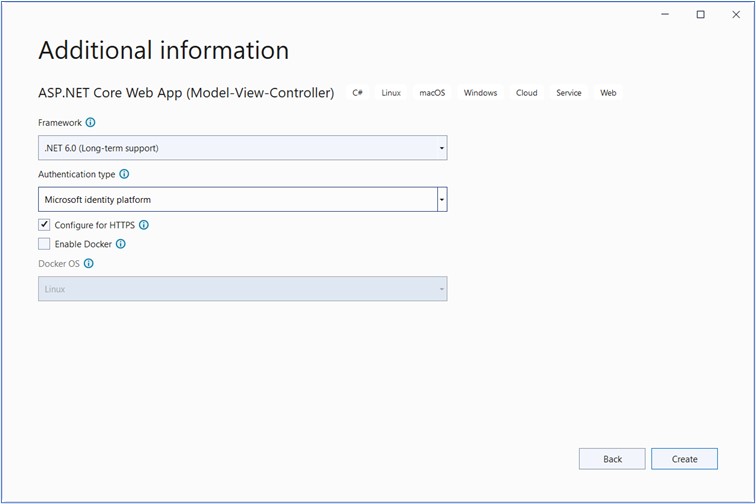
This application will be with Authentication Type Microsoft Identity platform.
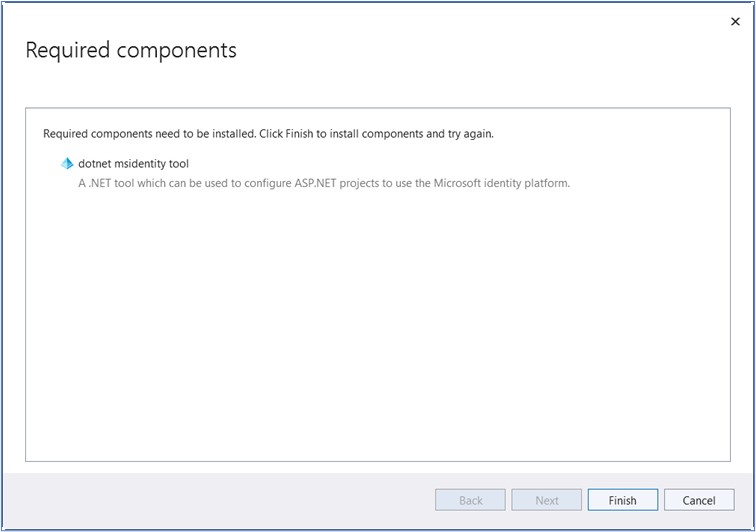
Install required components like dotnet msidentity tool.
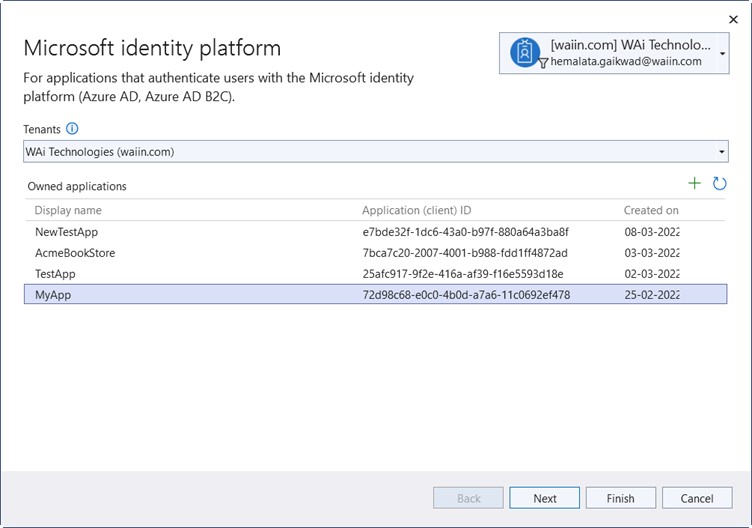
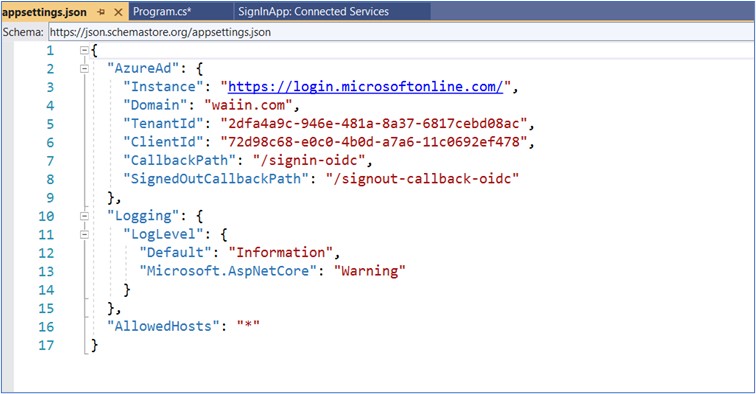
Update dependencies in Visual Studio. After updating, entries are generated in the appsettings.json file for Domain, ClientID etc.
Add link on the Index page of the application that will redirect the user to the ABP application
    @{
       ViewData["Title"] = "Home Page";

    }

    <div className="text-center">
    <h3 className="display-6">
        Welcome to Authentication Module
    <h3>
    <h2>
        <a  href="http://localhost:4200/dashboard" target="_blank">
        Login ABP</a>
    </h2>
    </div>
Creating an application in Azure Active Directory
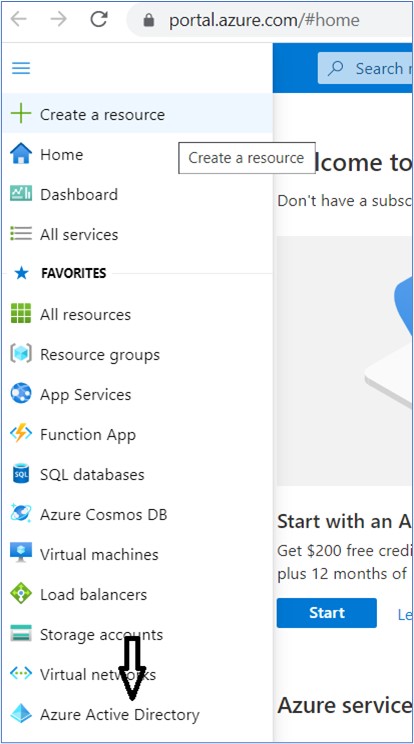
- Login into your Microsoft Azure account
- Select Azure Active directory in the left sidebar
Click + Add.
Click on App registration

Enter the application name
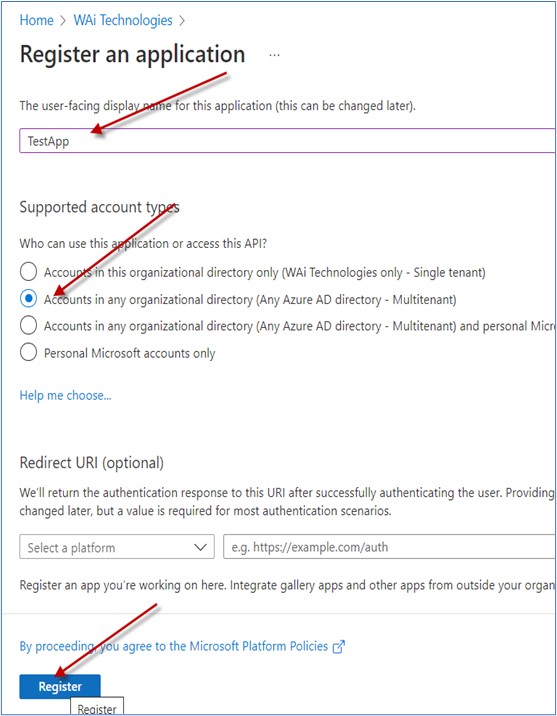
Click on Register button.
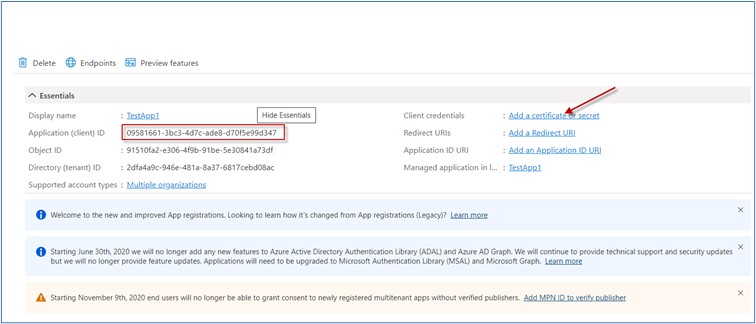
Getting the Client secret
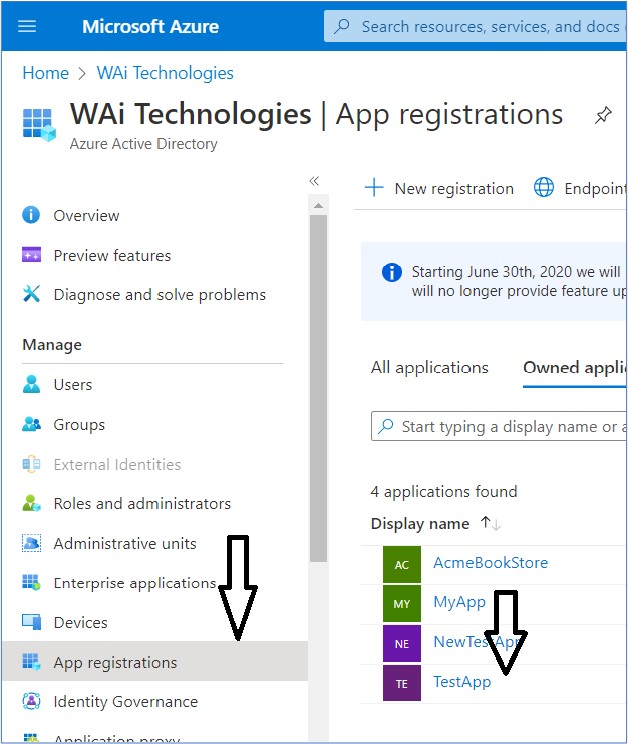
Select the application which you have created.
Click on Add a certificate or Secret
Click on +New client secret
Click on Add button

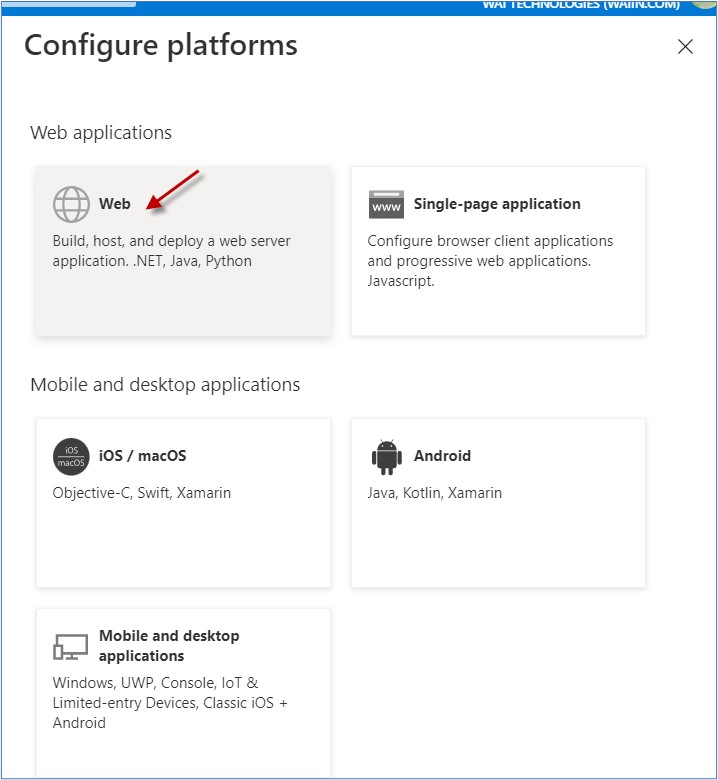
Click On Web
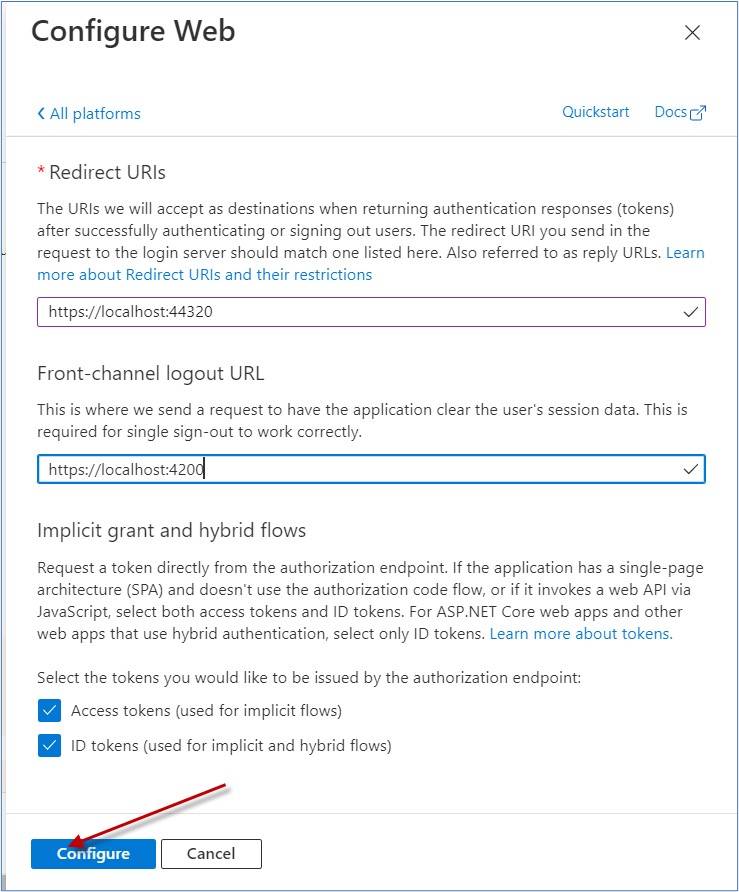
Configure Redirect URL
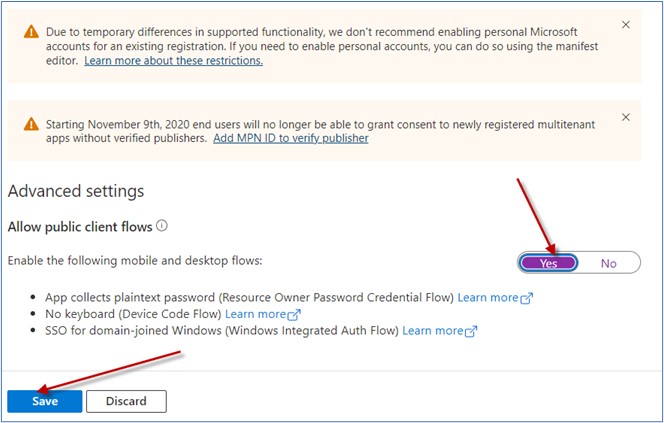
Set Advance Setting
Performing Changes in the ABP Web Application
Create a new ABP Commercial application either using the ABP CLI or through ABP Suite by following the steps outlined here
- abp suite/create solution | Documentation Center | ABP.IO
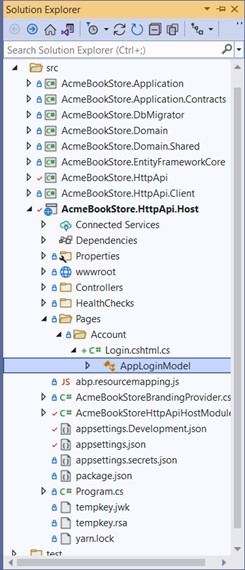
- Open the solution in visual studio 2022 and expand the Http.Api.Host project.
- Create new Razor Page as shown below under Pages - Account folder
Overwrite the method OnGetAsync()
    using Microsoft.AspNetCore.Authentication;
    using Microsoft.AspNetCore.Authentication.MicrosoftAccount;
    using Microsoft.AspNetCore.Identity;
    using Microsoft.AspNetCore.Mvc;
    using Microsoft.AspNetCore.Mvc.RazorPages;
    using Microsoft.Extensions.Options;
    using Owl.reCAPTCHA;
    using System.Threading.Tasks;
    using Volo.Abp.Account.ExternalProviders;
    using Volo.Abp.Account.Public.Web;
    using Volo.Abp.Account.Public.Web.Pages.Account;
    using Volo.Abp.Account.Security.Recaptcha;
    using Volo.Abp.DependencyInjection;
    using Volo.Abp.Security.Claims;
       namespace AcmeBookStore.Pages.Account
         {
            [Dependency(ReplaceServices = true)]
            [ExposeServices(typeof(LoginModel))]
            public class AppLoginModel : LoginModel
         {
            public AppLoginModel(IAuthenticationSchemeProvider schemeProvider,
            IOptions accountOptions, IAbpRecaptchaValidatorFactory
            recaptchaValidatorFactory, IAccountExternalProviderAppService
            accountExternalProviderAppService, ICurrentPrincipalAccessor
            currentPrincipalAccessor, IOptions identityOptions,
            IOptionsSnapshot reCaptchaOptions) : base(schemeProvider,
            accountOptions, recaptchaValidatorFactory, accountExternalProviderAppService,
            currentPrincipalAccessor, identityOptions, reCaptchaOptions)
         {
         }
            public override async Task OnGetAsync()
         {
            await base.OnGetAsync();
            return await OnPostExternalLogin(MicrosoftAccountDefaults.AuthenticationScheme);
            }
          }
        }
Add changes in class AcmeBookStoreHttpApiHostModule
          .AddMicrosoftAccount(MicrosoftAccountDefaults.AuthenticationScheme, "Connect with
           microsoft", options =>
            {
              options.AuthorizationEndpoint =
              "https://login.microsoftonline.com/common/oauth2/v2.0/authorize";
              options.TokenEndpoint = "https://login.microsoftonline.com/common/oauth2/v2.0/token";
              options.ClientId = "7bca7c20-2007-4001-b988-fdd1ff4872ad";
               options.ClientSecret = "JvE7Q~OqJedaFkRI5XuQqo3dMOEUaC5VD.vy1";
             })
Now run and test the application and SSO feature.
How it all works together
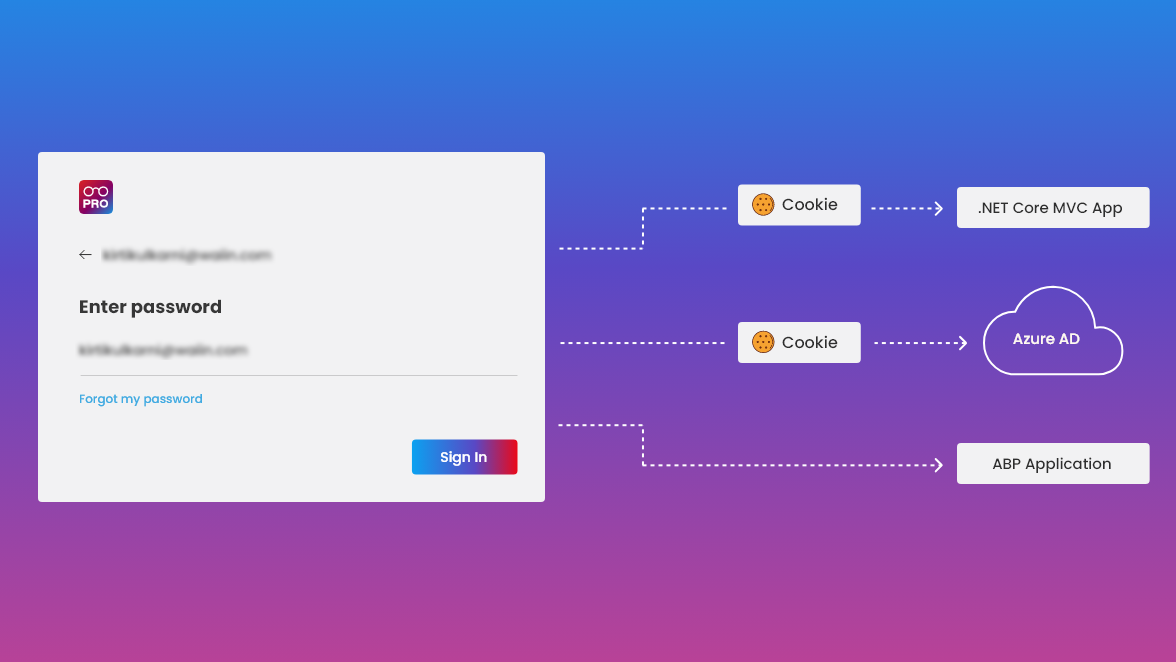
Ok. Now that you’ve seen how to enable it is to enable SSO for the two apps but let us now see what is really happening behind the scenes to make it all work together.
Let’s consider that first you log into the ASP.Net core client application, it will redirect you to the Microsoft sign page (identity provider) where you sign in.
After you sign in, a cookie will be set in your browser for the Microsoft domain.
This cookie keeps you signed into Microsoft identity platform. Then Microsoft will redirect you back to the ASP.Net application with a token which it uses to complete the sign-in process. At this point, a cookie is also set for the applications domain.
Featured Comments
Lorem ipsum dolor sit amet, consectetur adipiscing elit, sed do eiusmod tempor
Lorem ipsum dolor sit amet, consectetur adipiscing elit, sed do eiusmod tempor
Lorem ipsum dolor sit amet, consectetur adipiscing elit, sed do eiusmod tempor
More Articles from Kirti Kulkarni


With over 20 years of experience in software development, Kirti heads Product R&D and Competency Management at WAi Technologies, leading the training and skills upgradation program at WAi. Kirti introduced the ‘Women Back To Work' Initiative that encourages women to return back to mainstream software development after a career break or sabbatical.