Jun 14, 2022Beginner-12 min
Integrating Elsa .NET Workflows with ABP Commercial
In this article we have demonstrated about how to integrate .NET 5 Open-Source Workflow framework Elsa with ABP Commercial application.
What is Elsa .Net?
Elsa is an open-source .NET Standard Workflow framework. You can check it out at https://elsa-workflows.github.io/elsa-core/
Let us look at some of the key features of the Elsa .Net platform.
Elsa .Net is very Simple and Fast
The library is very compact and easy to use, at the same time, it is easy to extend through custom activities. Triggering event makes the corresponding workflow start automatically based on the event / recovery.
Elsa Supports long-running workflows
When the workflow is executed and needs to be done, for example, after user input, the workflow will stop, Keep, and run out of memory, until it can recover. It could be a few seconds later, a few minutes, few hours, days or even years.
Associate workflow with application-specific data
This is a key requirement of a long-running workflow. Store workflows in a file-based format, so we can make it a part of source control.
When we don't want the workflow to be part of source control, we can store it in a database based on the Web Version of the process designer. Whether it's storing workflow in a file system or in a database, whether to host the designer online or only on the local computer, need to be able to edit workflow online.
Use expressions to configure workflow activities
Usually, the information processed by workflow is dynamic in nature, Activities need a way to interact with that information. Workflow expressions support such scenarios.
Through application-specific activities, Support custom storage and script engine for an extension, call another workflow. This allows us to invoke reusable application logic from various workflow processes. Like from C# it's the same as calling general functions. View and analyze the workflow instances executed. View the path taken by the workflow, Runtime state, Where the failure occurs, and compensate for the failed workflow.
The workflow designer is embedded in our own dashboard application We can choose to create a workflow host that runs all the application logic , we can also choose to host the workflow runtime in a single microservice .
Separation of concerns
Workflow core library, the runtime and designer are completely separated in design. That is, when the workflow host should not rely on the web the designer. For example, This allows us to implement desktop-bas designers, or not use the designer at all, use YAML file. Last, Hosts only need workflow definitions and access to persistent storage. Support local or cloud management because Elsa It's just a set of NuGet software package.
Elsa with a separate, reusable HTML5 workflow designer web component, we can embed it in our own HTML on the web page. The designer runs entirely on the client-side and has a wealth of JavaScript API, The API allows us to define custom plug-ins to extend their functionality.
Getting Started with ABP commercial Angular application
Before creating project in abp.io we must purchase an active ABP commercial account
We are using Angular as the UI framework and Entity Framework Core as the database provider.
Setup our development environment
First things first! Let's setup our development environment before creating the first project.
Pre-requirements
The following tools should be installed on our development machine:
- Visual Studio 2022 for Windows / Visual Studio for Mac. 1
- .NET Core 5.0+
- Node v12 or v14
- Yarn v1.20+ (not v2)2 or npm v6+ (already installed with Node)
Redis (as the distributed cache) is required if we select the Public website option.
We can use another editor instead of Visual Studio if it supports .NET Core and ASP.NET Core.
Yarn v2 works differently and is not supported.
Install the ABP CLI
ABP CLI is a free & open-source tool for the ABP framework. It is also used for ABP Commercial application development.
First, we need to install the ABP CLI using the following command:
dotnet tool install -g Volo.Abp.CliIf we’ve already installed, we can update it using the following command:
dotnet tool update -g Volo.Abp.CliLogin to account
In order to use ABP Commercial features, we need to login our account using the ABP CLI
abp login Install the ABP Suite
ABP Suite is an application aims to assist us on our development.
First, we need to install the ABP Suite:
abp suite installIf we've already installed, we can update it:
abp suite update 
Click to the Create a new solution button and fill the modal form:
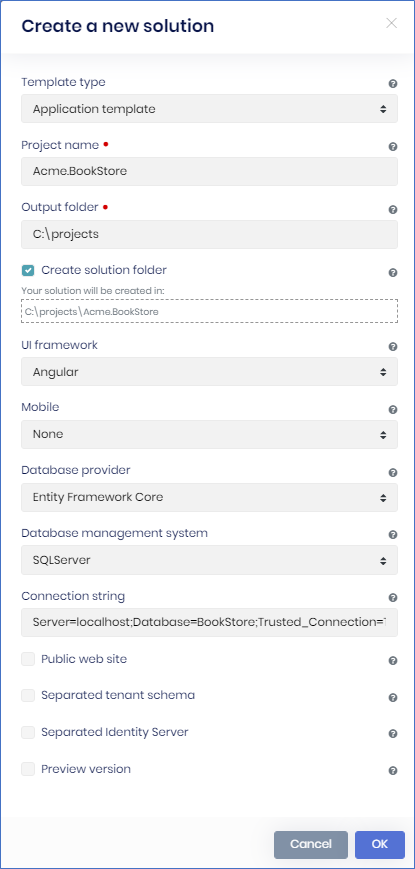
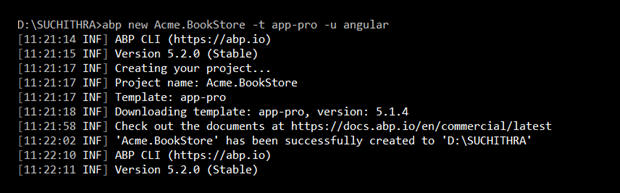
Using the ABP CLI to create a new project
Use the new command of the ABP CLI to create a new project:
The solution structures
The solution has a layered structure (based on the Domain Driven Design ) and contains unit & integration test projects. See the solution structure document to understand the solution structure in detail. https://docs.abp.io/en/commercial/latest/startup-templates/application/solution-structure
Create the Database
Connection String
Check the connection string in the appsettings.json file under the .HttpApi.Host project.
"ConnectionStrings": {
        "Default": "Server=localhost;Database=elsaangular;Trusted_Connection=True"
    }
Database Migrations
The solution uses the Entity Framework Core Code First Migrations. It comes with a .DbMigrator console application which applies the migrations and also seeds the initial data. It is useful on development as well as on production environment..DbMigrator project has its own appsettings.json. So, if we have changed the connection string above, we should also change this one.
The Initial Migration
DbMigrator application automatically creates the Initial migration on first run.
If we are using Visual Studio, we can skip to the Running the DbMigrator section. However, other IDEs (e.g. Rider) may have problems for the first run since it adds the initial migration and compiles the project. In this case, open a command line terminal in the folder of the .DbMigrator project and run the following command:
dotnet runRunning the DbMigrator
Right click to the .DbMigrator project and select Set as StartUp Project

Hit F5 (or Ctrl+F5) to run the application. It will have an output like shown below:
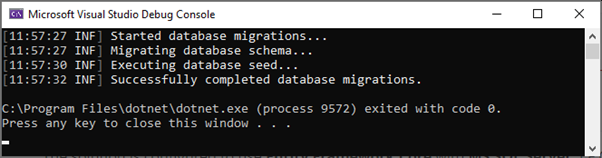
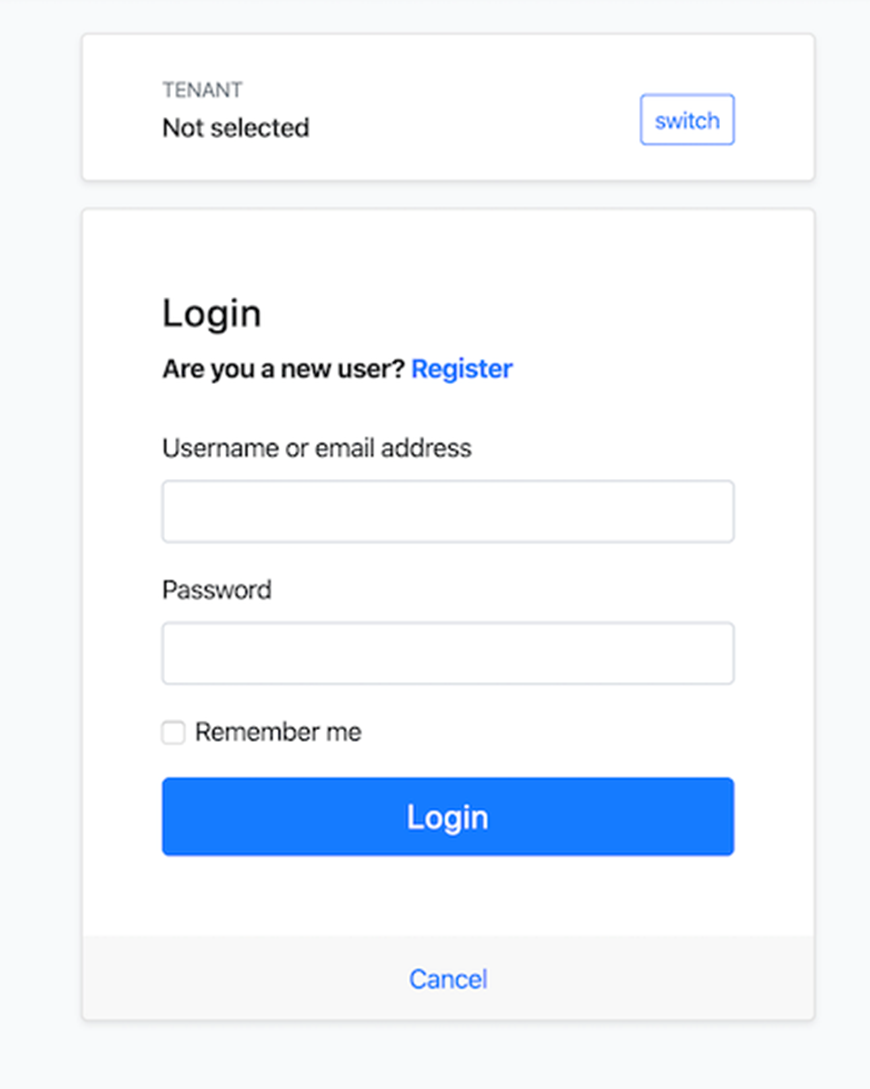
Initial seed data creates the admin user in the database (with the password is 1q2w3E*) which is then used to login to the application. So, we need to use .DbMigrator at least once for a new database.
Run the Application
Running the HTTP API Host (Server Side)
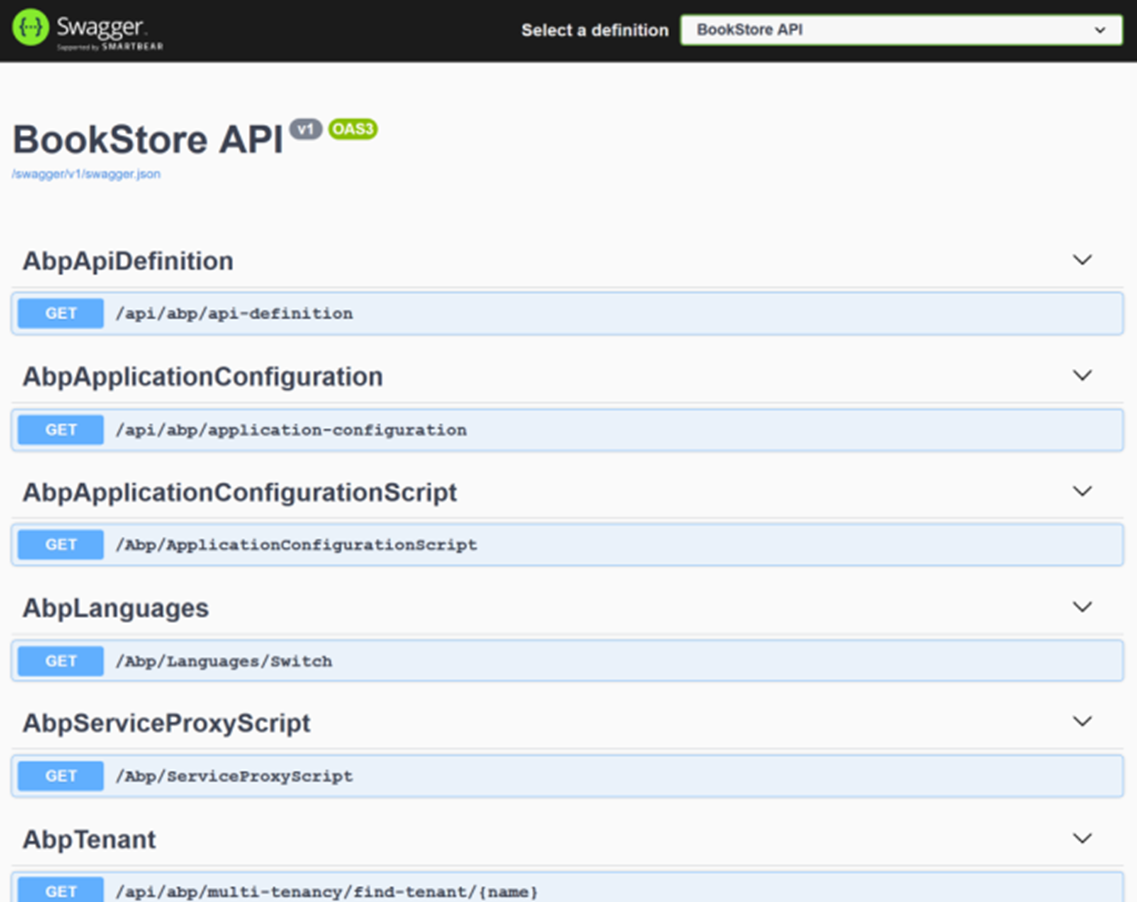
Ensure that the HttpApi.Host project is the start-up project and run the application which will open a Swagger UI:Use Ctrl+F5 in Visual Studio (instead of F5) to run the application without debugging. If we don't have a debug purpose, this will be faster.
Running the Angular Application (Client Side)
Go to the angular folder, open a command line terminal, type the yarn command (we suggest to the yarn package manager while npm install will also work)Go to the angular folder, open a command line terminal, type the yarn command (we suggest to the yarn package manager while npm install will also work)
yarnOnce all node modules are loaded, execute yarn start (or npm start) command:
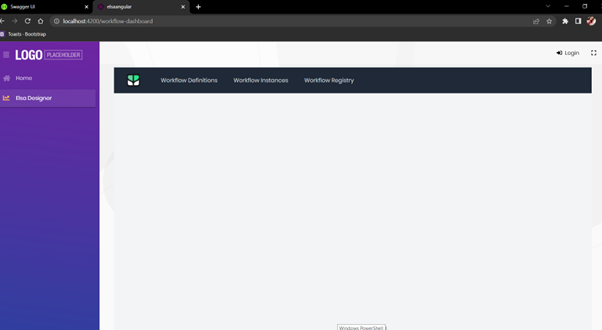
yarn startIt may take a longer time for the first build. Once it finishes, it opens the Angular UI in our default browser with the localhost:4200 address.
Elsa Integration
Backend
Installing Elsa Dashboard
The UI portion of Elsa Workflows is provided as a set of HTML web components in the form of the @elsa-workflows/elsa-workflow-designer NPM package.
The web components can be used as normal HTML tags in our own HTML documents, which means that we can re-host the designer and even the dashboard UI in our own web application.
To make it easy for ASP.NET Core developers to integrate the visual designer into their own project, the components are made available via the Elsa.Designer.Components.Web NuGet package, which embeds the necessary client asset files.
Add Package
To add the package to our ASP.NET Core project, we have to run the following command:
1. Host Project
dotnet add package Elsa
dotnet add package Elsa.Activities.Email
dotnet add package Elsa.Activities.Http
dotnet add package Elsa.Activities.Temporal.Quartz
dotnet add package Elsa.Persistence.EntityFramework.Sqlserver
dotnet add package Elsa.Server.Api
dotnet add package Elsa.Designer.Components.Web
2. pt-3 Domain Project
dotnet add package Elsa
dotnet add package Elsa.Activities.Email
dotnet add package Elsa.Activities.Http
dotnet add package Elsa.Activities.Temporal.Quartz
dotnet add package Elsa.Persistence.EntityFramework.Sqlserver
dotnet add package Elsa.Server.Api
After these installations we must do some changes in host projectOpen HttpApiHostModule.cs file We need to do some changes in the swagger method
Add the following line
private static void ConfigureSwagger(ServiceConfigurationContext context, IConfiguration configuration)
    {
     context.Services.AddAbpSwaggerGenWithOAuth(
     configuration["AuthServer:Authority"],
      new Dictionary<string, string>
       {
         {"elsaangular", "elsaangular API"}
       },
         options =>
       {
         options.SwaggerDoc("v1", new OpenApiInfo { Title = "elsaangular API", Version = "v1" });
         options.DocInclusionPredicate((docName, description) => true);
         options.CustomSchemaIds(type => type.FullName);

     //Add the below line

         options.ResolveConflictingActions(apiDescriptions => apiDescriptions.First());
       });
    }
Add a new function ConfigureElsa
private static void ConfigureElsa(ServiceConfigurationContext context, IConfiguration configuration)
    {
     context.Services
     .AddElsa(elsa => elsa
     .UseEntityFrameworkPersistence(ef =>
     DbContextOptionsBuilderExtensions.UseSqlServer(ef,
     context.Services.GetConfiguration().GetConnectionString("Default")))
      .AddHttpActivities()
      .AddQuartzTemporalActivities()
      .AddJavaScriptActivities()
      .AddEmailActivities()
      .AddWorkflowsFrom()
      .AddActivitiesFrom()
     );

     // Elsa API endpoints.
      context
      .Services
      //.AddWorkflowContextProvider() //use this when using custom context provide
      .AddElsaApiEndpoints();
      context.Services.Configure(options => { options.UseApiBehavior = false; }); //Add these lines
      context.Services
      .AddCors(cors =>
      cors
      .AddDefaultPolicy(policy => policy
      .AllowAnyHeader()
      .AllowAnyMethod()
      .AllowAnyOrigin()
      .WithExposedHeaders("Content-Disposition")));//Add these lines
    }
Add these following lines inside ConfigureServices
public override void ConfigureServices(ServiceConfigurationContext context)
    {
     //We can disable this setting in production to avoid any potential security risks.
     Microsoft.IdentityModel.Logging.IdentityModelEventSource.ShowPII = true;

     var configuration = context.Services.GetConfiguration();
     var hostingEnvironment = context.Services.GetHostingEnvironment();

     ConfigureUrls(configuration);
     ConfigureBundles();
     ConfigureConventionalControllers();
     ConfigureAuthentication(context, configuration);
     ConfigureImpersonation(context, configuration);
     ConfigureSwagger(context, configuration);
     ConfigureElsa(context, configuration); // Add this line
     ConfigureLocalization();
     ConfigureVirtualFileSystem(context);
     ConfigureCors(context, configuration);
     ConfigureExternalProviders(context);
     ConfigureHealthChecks(context);

     // Add these two lines below

     PreConfigure(options => { options.UseHybridSerializer = false; });
     Configure(options => { options.AutoValidateFilter = type => type.Assembly != typeof(Elsa.Server.Api.Endpoints.WorkflowRegistry.Get).Assembly; }); line

    }
Add the following lines in OnApplicationInitialization function
public override void OnApplicationInitialization(ApplicationInitializationContext context)
    {
     var app = context.GetApplicationBuilder();
     var env = context.GetEnvironment();

     if (env.IsDevelopment())
      {
       app.UseDeveloperExceptionPage();
      }

     app.UseAbpRequestLocalization();

     if (!env.IsDevelopment())
      {
       app.UseErrorPage();
      }

     app.UseStaticFiles();


     if (MultiTenancyConsts.IsEnabled)
      {
       app.UseMultiTenancy();
      }

     app.UseUnitOfWork();
     app.UseIdentityServer();
     app.UseAuthorization();
     app.UseSwagger();
     app.UseAbpSwaggerUI(options =>
      {
       options.SwaggerEndpoint("/swagger/v1/swagger.json", "elsaangular API");
       var configuration = context.ServiceProvider.GetRequiredService();
       options.OAuthClientId(configuration["AuthServer:SwaggerClientId"]);
       options.OAuthClientSecret(configuration["AuthServer:SwaggerClientSecret"]);
      });
       app.UseAuditing();
       app.UseAbpSerilogEnrichers();
       app.UseHttpActivities();  /// Add this line here
       app.UseConfiguredEndpoints();
      }
Run the Backend
Use the command: dotnet run –launch-profile elsaangular.HttpApi.Host
Domain module
public override void ConfigureServices(ServiceConfigurationContext context)
    {
     PreConfigure(options => { options.UseHybridSerializer = false; }); // Add this line

     Configure(options =>
       {
         options.IsEnabled = MultiTenancyConsts.IsEnabled;
       });

     Configure(options =>
       {
         options.Languages.Add(new LanguageInfo("ar", "ar", "العربية", "ae"));

         options.Languages.Add(new LanguageInfo("es", "es", "Español", "es"));
       });

     #if DEBUG
         context.Services.Replace(ServiceDescriptor.Singleton<IEmailSender, NullEmailSender>());
     #endif
     },
In the HttpApi.Host Module add the following
<Project Sdk="Microsoft.NET.Sdk.Web">
    <Import Project="....common.props" />
    <PropertyGroup>
   <TargetFramework>net6.0</TargetFramework>
   <AspNetCoreHostingModel>InProcess</AspNetCoreHostingModel>
   <RootNamespace>elsaangular</RootNamespace>
     <PreserveCompilationReferences>true</PreserveCompilationReferences>
    </PropertyGroup>
    <ItemGroup>
   <PackageReference Include="AspNetCore.HealthChecks.UI" Version="6.0.1-rc2.4" />
   <PackageReference Include="AspNetCore.HealthChecks.UI.Client" Version="6.0.1-rc2.4" />
   <PackageReference Include="AspNetCore.HealthChecks.UI.InMemory.Storage" Version="6.0.1-rc2.4" />
   <PackageReference Include="Elsa" Version="2.5.0" />
   <PackageReference Include="Elsa.Activities.Email" Version="2.5.0" />
   <PackageReference Include="Elsa.Activities.Http" Version="2.5.0" />
   <PackageReference Include="Elsa.Activities.Temporal.Quartz" Version="2.5.0" />
   <PackageReference Include="Elsa.Persistence.EntityFramework.SqlServer" Version="2.5.0" />
   <PackageReference Include="Elsa.Server.Api" Version="2.5.0" />
   <PackageReference Include="Elsa.Designer.Components.Web" Version="2.5.0" />

   <PackageReference Include="Serilog.AspNetCore" Version="4.0.0" />
   <!--Added Line-->
   <PackageReference Include="Serilog.Sinks.Async" Version="1.5.0" />
   <!--Added Line-->
   <PackageReference Include="Microsoft.AspNetCore.Authentication.Google" Version="6.0.0" />
   <PackageReference Include="Microsoft.AspNetCore.Authentication.MicrosoftAccount" Version="6.0.0" />
   <PackageReference Include="Microsoft.AspNetCore.Authentication.Twitter" Version="6.0.0" />
   <PackageReference Include="Volo.Abp.AspNetCore.MultiTenancy" Version="5.2.0" />
   <PackageReference Include="Volo.Abp.Autofac" Version="5.2.0" />
   <PackageReference Include="Volo.Abp.AspNetCore.Serilog" Version="5.2.0" />
   <PackageReference Include="Volo.Abp.Swashbuckle" Version="5.2.0" />
   <PackageReference Include="Volo.Abp.Account.Pro.Public.Web.IdentityServer" Version="5.2.0" />
   <PackageReference Include="Volo.Abp.Account.Pro.Public.Web.Impersonation" Version="5.2.0" />
   <PackageReference Include="Volo.Abp.AspNetCore.Mvc.UI.Theme.Lepton" Version="5.2.0" />
    </ItemGroup>
    <ItemGroup>
   <ProjectReference Include="..elsaangular.Applicationelsaangular.Application.csproj" />
   <ProjectReference Include="..elsaangular.EntityFrameworkCoreelsaangular.EntityFrameworkCore.csproj" />
   <ProjectReference Include="..elsaangular.HttpApielsaangular.HttpApi.csproj" />
    </ItemGroup>
    <ItemGroup>
   <Compile Remove="Logs**" />
   <Content Remove="Logs**" />
   <EmbeddedResource Remove="Logs**" />
   <None Remove="Logs**" />
    </ItemGroup>
   </Project>
Angular Application
Create a folder named statichtml inside the assets folder then add an html file named as workflow-designer.html
Copy and paste the below contents inside this file.
<!DOCTYPE html>
    <html lang="en">
    <head>
    <meta charset="utf-8"/>
    <meta name="viewport" content="width=device-width, initial-scale=1.0"/>
    <title>Elsa Workflows</title>
    <link rel="icon" type="image/png" sizes="32x32" href="{serviceurl}/_content/Elsa.Designer.Components.Web/elsa-workflows-studio/assets/images/favicon-32x32.png">
    <link rel="icon" type="image/png" sizes="16x16" href="{serviceurl}/_content/Elsa.Designer.Components.Web/elsa-workflows-studio/assets/images/favicon-16x16.png">
    <link rel="stylesheet" href="{serviceurl}/_content/Elsa.Designer.Components.Web/elsa-workflows-studio/assets/fonts/inter/inter.css">
    <link rel="stylesheet" href="{serviceurl}/_content/Elsa.Designer.Components.Web/elsa-workflows-studio/elsa-workflows-studio.css">
    <script src="{serviceurl}/_content/Elsa.Designer.Components.Web/monaco-editor/min/vs/loader.js"></script>
    <script type="module" src="{serviceurl}/_content/Elsa.Designer.Components.Web/elsa-workflows-studio/elsa-workflows-studio.esm.js"></script></head>
    <body className="h-screen" style="background-size: 30px 30px; background-image: url({serviceurl}/_content/Elsa.Designer.Components.Web/elsa-workflows-studio/assets/images/tile.png); background-color: #FBFBFB;">
    <elsa-studio-root server-url="{serviceurl}" monaco-lib-path="{serviceurl}/_content/Elsa.Designer.Components.Web/monaco-editor/min">
    <elsa-studio-dashboard></elsa-studio-dashboard>
    </elsa-studio-root>
    </body>
    </html>
Create a component workflow
ng g c workflow
cd workflow
ng g s workflow
Inside the workflow.service.ts
Add the function getDashboard()
getDashboard() {
        const url = window.location.origin + '/assets/statichtml/workflow-designer.html';
         const request = this.http.get(url, {
           headers: new HttpHeaders({
               Accept: 'text/plain'
           }), responseType: 'text'
         });

           return request;
       }
Replace the contents in workflow.component.html by the following lines
<div id="workflow-dashboard-section"></div>Replace the contents in workflow.component.ts by the following contents
 import { DOM_STRATEGY, CROSS_ORIGIN_STRATEGY, StyleLoadingStrategy, ScriptLoadingStrategy, LazyLoadService } from '@abp/ng.core';
       import { Component, OnInit } from '@angular/core';
       import { forkJoin } from 'rxjs';
       import { environment } from 'src/environments/environment';
       import { WorkflowService } from './workflow.service';

       const domStrategy = DOM_STRATEGY.AppendToHead();

       const crossOriginStrategy = CROSS_ORIGIN_STRATEGY.None(
       );

       const loadingStrategy1 = new StyleLoadingStrategy(
         environment.apis.default.url + '/_content/Elsa.Designer.Components.Web/elsa-workflows-studio/assets/images/favicon-32x32.png',
         domStrategy,
         crossOriginStrategy,
       );
       const loadingStrategy2 = new StyleLoadingStrategy(
         environment.apis.default.url + '/_content/Elsa.Designer.Components.Web/elsa-workflows-studio/assets/images/favicon-16x16.png',
         domStrategy,
         crossOriginStrategy,
       );
       const loadingStrategy3 = new StyleLoadingStrategy(
         environment.apis.default.url + '/_content/Elsa.Designer.Components.Web/elsa-workflows-studio/assets/fonts/inter/inter.css',
         domStrategy,
         crossOriginStrategy,
       );

       const loadingStrategy5 = new ScriptLoadingStrategy(
         environment.apis.default.url + '/_content/Elsa.Designer.Components.Web/monaco-editor/min/vs/loader.js',
         domStrategy,
         crossOriginStrategy,
       );
       const loadingStrategy6 = new ScriptLoadingStrategy(
         environment.apis.default.url + '/_content/Elsa.Designer.Components.Web/elsa-workflows-studio/elsa-workflows-studio.esm.js',
         domStrategy,
         crossOriginStrategy,
       );

       @Component({
         selector: 'app-workflow',
         templateUrl: './workflow.component.html',
         styleUrls: ['./workflow.component.scss']
       })
       export class WorkflowComponent implements OnInit {

         private stylesLoaded$ = forkJoin([
       this.lazyLoad.load(
         loadingStrategy1,
       ),
       this.lazyLoad.load(
         loadingStrategy2,
       ),
       this.lazyLoad.load(
         loadingStrategy3,
       )
         ]
         );

         private scriptsLoaded$ = forkJoin(
       [this.lazyLoad.load(
         loadingStrategy5
       )]
         );

         scriptsAndStylesLoaded$ = forkJoin([this.stylesLoaded$, this.scriptsLoaded$]);

         constructor(private serviceWorkflow: WorkflowService, private lazyLoad: LazyLoadService) { }

         ngOnInit(): void {
       this.getDashboard();
         }

         getDashboard() {
       this.serviceWorkflow.getDashboard().subscribe(async res => {
         if (!res) { return; }
         this.scriptsAndStylesLoaded$.subscribe(element => {
       setTimeout(() => {
         const finalElsa = res.replace(/{serviceurl}/g, environment.apis.default.url);
         (document.querySelector('#workflow-dashboard-section')).innerHTML = finalElsa;
       }, 300);
         });
       });
         }

       }
Add these lines to main.ts file
 const script = document.createElement('script');
       script.src = environment.apis.default.url + '/_content/Elsa.Designer.Components.Web/elsa-workflows-studio/elsa-workflows-studio.esm.js';
       script.type = 'module';
       document.head.appendChild(script);
elsa-workflows-studio.esm.js is called form the backend
Add the route to workflow dashboard in app-routing.module.ts
{
        path: 'workflow-dashboard',
        component: WorkflowComponent
    },
Open angular root folder. Run the Angular application
D:\elsaangular\angular - yarn start
A Simple Document Approval Workflow
Before we try out the workflow, let's setup an SMTP host. The easiest way to do so is by running Smtp4Dev using Docker:
docker run -p 3000:80 -p 2525:25 rnwood/smtp4dev:linux-amd64-3.1.0-ci0856
When Smtp4Dev has started, we'll be able to navigate to its dashboard at http://localhost:3000/ and inspect the emails the workflow will send.
Document Approval Workflow: Visual Designer
Creating the workflow visually is quite simple. Just add the activities one by one and configure their settings. However, there's one important difference between coded workflows and designed workflows: when designing visual workflows, there's (currently) no way to specify expressions using C# code as we did in the form of lambda statements in the DocumentApprovalWorkflow class. Instead, we must use JavaScript and Liquid expressions. The latter is specifically useful when we need to generate a body of text using dynamic data.
Without further ado, let's create a new workflow called using the dashboard!
Create Workflow
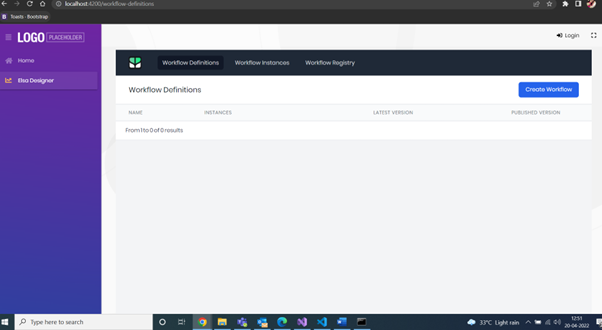
With the Elsa Dashboard in front of we, navigate to the Workflow Definitions page and click the Create button. We should now see an empty canvas with just a Start button and a cog wheel to configure workflow settings.
Let's do that first: click the cog wheel and specify the following:
- Name: VisualDocumentApprovalWorkflow
- Display Name: Visual Document Approval Workflow
Click Save.
HTTP Endpoint
Now click the Start button and look for the HTTP Endpoint activity and select it. Configure it with the following settings:
- Path: /v2/documents
- Methods: POST
- Read Content: true (checked)
Set Document Variable
Click the Done outcome button on the previous activity and look for the Set Variable activity and configure it as follows:
- Variable Name: Document
- Value: input.Body (JavaScript)
Send Email to Josh the Approver
Click the Done outcome button on the previous activity and look for the Send Email activity and configure it as follows:
- From: workflow@acme.com
- To: josh@acme.com
- Subject: Document received from Variables.Document.Author.Name (Liquid)
HTTP Response: Document Received
Click the Done outcome button on the previous activity and look for the HTTP Response activity and configure it as follows:
- Status Code: OK
- Content: Request for Approval Sent Our document has been received and will be reviewed shortly.
- Content Type: text/html
Fork
Click the Done outcome button on the previous activity and look for the Fork activity and configure it as follows:
- Branches: Approve, Reject, Remind
Approve: Signal Received
Click the Approve outcome button on the previous activity and look for the Signal Received activity and configure it as follows:
- Signal: Approve
Send Approved Email to Author
Click the Done outcome button on the previous activity and look for the Send Email activity and configure it as follows:
- From: workflow@acme.com
- To: [Document.Author.Email] (JavaScript)
- Subject: Document Variables.Document.Id Approved! (Liquid)
- Body: Great job Variables.Document.Author.Name , that document is perfect. (Liquid)
Reject: Signal Received
Click the Reject outcome button on the Fork activity and look for the Signal Received activity and configure it as follows:
- Signal: Reject
Send Rejected Email to Author
Click the Done outcome button on the previous activity and look for the Send Email activity and configure it as follows:
- From: workflow@acme.com
- To: [Document.Author.Email] (JavaScript)
- Subject: Document Variables.Document.Id Rejected (Liquid)
- Body: Nice try Variables.Document.Author.Name , but that document needs work. (Liquid)
Remind: Timer
Click the Remind outcome button on the Fork activity and look for the Timer activity and configure it as follows:
- Timeout: Duration.FromSeconds(10) (JavaScript)
Send Reminder Email to Josh the Approver
Click the Remind outcome button on the Fork activity and look for the Timer activity and configure it as follows:
- From: workflow@acme.com
- To: josh@acme.com
- Subject: Variables.Document.Author.Name is waiting for your review! (Liquid)
Now connect the Send Email activity we just added back to the Timer activity so that the workflow will keep sending reminders for as long as we haven't received a signal. To connect an outcome to an existing activity,f simply press and hold the SHIFT button while clicking the outcome. Release the SHIFT button and left click on the target activity:
Join
Click the Done outcome button of the Send Email activity in the Approve branch and look for the Join activity and configure it as follows:
Mode: WaitAny
We also need to connect the Send Email Send Email activity from the Reject branch using the same technique used to connect the reminder Send Email activity back to the Timer activity:
HTTP Response: All set!
Finally, we just write a simple HTTP response, completing the workflow.
Click the Done outcome button of the Join activity and look for the HTTP Response activity and configure it as follows:
- Status Code: OK
- Content: Thanks for the hard work!
- Content Type: text/html
Second Run
Make sure to publish our changes and then issue the following HTTP request:
POST /v2/documents HTTP/1.1
       Host: localhost: 44364
       Content-Type: application/json
       {
           "Id": "4",
           "Author": {
           "Name": "Hannah",
           "Email": "hannah@gmail.com"
           },
           "Body": "This is another sample document."
       }
Conclusion
Workflows are a powerful tool for implementing long-running process. Elsa aims to make this easy by providing an easy-to-use set of APIs and tools to design and execute workflows. Although we combined the Dashboard with workflow execution into the same application, this is not mandatory. We can see that the workflow is working as expected. Either we can call the URL from postman or any other REST API tools. It’s just as easy to create two separate applications, where one represents the dashboard, while the other represents your real-world application that executes the workflows designed with the Dashboard.
For more information, please check out https://elsa-workflows.github.io/elsa-core/.
Featured Comments
Lorem ipsum dolor sit amet, consectetur adipiscing elit, sed do eiusmod tempor
Lorem ipsum dolor sit amet, consectetur adipiscing elit, sed do eiusmod tempor
Lorem ipsum dolor sit amet, consectetur adipiscing elit, sed do eiusmod tempor
More Articles from Kirti Kulkarni


With over 20 years of experience in software development, Kirti heads Product R&D and Competency Management at WAi Technologies, leading the training and skills upgradation program at WAi. Kirti introduced the 'Women Back To Work' Initiative that encourages women to return back to mainstream software development after a career break or sabbatical.